Hello friends, today we are going to try something very practical with the trending glow photo making effect. You have probably seen neon outlines, glowing wings, or soft light around faces on Instagram, TikTok, or WhatsApp profiles and wondered which app people are using and how they get that clean look without looking fake or blurry.
This blog will walk you through a simple workflow to create glow style photos using common Android or iPhone apps. You will see how to choose the right base photo, which tools and settings to touch, and what small mistakes usually ruin the final image quality when people rush to follow a trend.
The guide is written for casual users, not only for pro editors. If you are a student, content creator, online seller, or just someone who wants a cool profile picture, you can still follow these steps. You do not need expensive software, but you do need to understand a few basic editing ideas like contrast, blend mode, and export size.
We will focus on safe apps that are popular in the Play Store and App Store, such as PicsArt, Lightroom, and a few AI based editors. The same logic applies if your favorite app is different. Once you understand how glow edges and neon lines are built, you can use any trusted editor to repeat the look and experiment with your own style.
Copy-Ready Prompts
Use the prompts below in ChatGPT, Gemini, or another AI assistant. On your published site, each prompt shortcode will render as a styled prompt card with a copy button.
Prompt 1
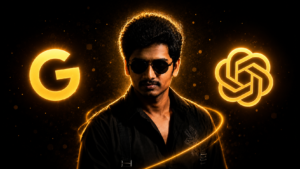
Ultra realistic cinematic studio portrait of a young South Asian man wearing a black shirt with subtle embroidery and black suspenders, dark sunglasses, confident serious expression, dramatic low key lighting, pure black background, intense golden rim light glow around hair and shoulders, glowing golden aura behind head, warm orange cinematic backlight, floating golden dust particles and bokeh sparks, ultra sharp facial details, moody shadows, high contrast, stylish mass hero look, luxury editorial photography, DSLR quality, 85mm lens, shallow depth of field, crisp skin texture, dark aesthetic, premium color grading, realistic hair highlights, cinematic poster style, 4K ultra HD, centered composition, powerful attitude, black and gold theme, studio glow effect, soft haze lighting, dramatic portrait photography.
What Is The Trending Glow Photo Making Effect
Glow photos usually have bright light around the subject or object. This can be a neon outline around a person, a light trail behind a moving pose, or a soft halo on the face. Social media trends often combine glow effects with dark backgrounds and strong colors like blue, purple, pink, or cyan.

Most users create these looks by mixing three parts: a clean base photo, a glow outline or brush, and some light adjustments on exposure and contrast. Some apps add one tap templates, but those rarely fit every face or body size, so a little manual tuning is still helpful.
Apps You Can Use For Glow Photo Effects
The exact app choice is flexible, but it is safer to stay with well known editors from the official store. These are common options people use for the trending glow photo making effect:
- PicsArt or similar layer based editor for glow outlines and stickers
- Lightroom Mobile for light and color control
- Canva or similar design app for text glow and social media layout
- AI photo apps that offer automatic neon or cyberpunk filters
Always install from the official Play Store or App Store, check ratings and recent reviews, and avoid random APK files from unknown websites. Some unofficial installers bundle ads or unsafe permissions, which is not worth the risk for a simple photo trend.
Step By Step Workflow To Create A Glow Photo
This workflow uses a typical editing app that supports layers and brushes. The naming of tools can change between apps, so treat this as a flexible checklist, not a strict recipe.
Step 1: Pick A Strong Base Photo
Choose a clear photo with a simple background and good lighting. Glow looks better when the subject has clean edges and is not lost in a busy scene. Portraits with dark or plain walls, or standing at night near a light source, usually work very well.
Avoid heavily compressed images from WhatsApp forwards, since they already lost detail. If needed, use your original camera file or a fresh selfie instead of recycled screenshots.
Step 2: Cut Out Or Separate The Subject
Many trending edits use a separate subject layer. Use your app subject cutout, background remover, or manual eraser to isolate the person. Keep an eye on hair edges and fingers, since rough cutouts make the glow look cheap.
Some AI tools do this with one tap, but results can vary by hair style and background color. Zoom in and clean edges for a few minutes, especially around the face and shoulders.
Step 3: Set The Background For Contrast
Glow stands out when the background is darker than the glowing line. Replace your background with a plain dark color, a night city photo, or a gradient. Many mobile users prefer dark purple or navy blue backgrounds, since neon colors pop nicely on those.
Keep the background simple first. If you add too many elements, the glow stops being the hero of the frame and the trend effect feels lost.
Step 4: Add The Glow Outline Or Brush
Now create a new layer above the subject layer. Select a bright brush in your app, usually soft round or neon brush, and choose a strong color like cyan or pink. Draw a line around the body, cheeks, or object that you want to highlight.
After that, apply a blur or glow effect to the line layer. In many apps the effect is named glow, outer glow, or Gaussian blur combined with screen blend. Reduce opacity until the line still looks bright but not like a solid cartoon stroke.
Step 5: Add Extra Light Details
You can add small details like floating light dots, glowing wings, or a neon circle behind the head. Stickers inside apps are a fast option, but check resolution. Some free sticker packs are low quality and will look pixelated after export.
Use only one or two extra elements. The more you add, the more it looks like a cluttered poster instead of a modern glow portrait.
Step 6: Tweak Light And Color
Open your light panel or basic adjustment tools. Increase contrast a bit, pull down shadows slightly, and boost vibrance or saturation only enough to support the neon look. If skin becomes too orange or red, use saturation sliders on specific color ranges to balance it.
Many beginners overdo clarity and sharpening. That makes edges harsh and the glow looks disconnected from the face. Keep sharpening low, especially if you already used AI enhancement.
Step 7: Export Without Destroying Quality
When exporting, select high quality JPEG or PNG and keep the resolution large enough for the platform you use. For Instagram or WhatsApp, around 1080 pixels on the short side usually works fine. Do not repeatedly re edit the same downloaded file, since each save can add compression noise.
Example Ideas You Can Copy
To make this easier, here are two real world style ideas that match current social media trends.
Example 1: Neon Outline Profile Photo
Take a straight portrait facing the camera, cut out the subject, place it on a dark purple background, draw a cyan outline around the shoulders and hair, then add a soft glow to the line. Increase contrast slightly and cool down the white balance for a cyber look.
Example 2: Glow Around A Product
If you sell gadgets or accessories, shoot the item on a black table. Add a thin neon ring behind the product layer, blur the ring to create a glow, then add a subtle reflection under the product. This gives a modern advertisement style without looking cheap.
Mini Case Study: Fixing A Failed Glow Edit
Imagine a user tries to follow the glow trend with a noisy selfie taken in a crowded market. They apply a random one tap neon filter from a low rated app. The result is a grainy image with broken edges and too many stickers. When they upload it as a profile photo, details vanish and the glow becomes a blur.
To repair this, they restart with a cleaner indoor selfie near a window, cut out the subject properly, choose one solid dark background, and manually draw a single neon outline with a reliable app. By exporting at higher quality and avoiding multiple reposts, the final image stays sharp and the glow is actually visible on smaller screens.
Common Mistakes With Glow Photo Effects
- Using extremely low resolution photos taken from messaging apps
- Adding too many stickers or text elements so the main subject is lost
- Over sharpening, which makes the glow look like a sticker instead of soft light
- Using unsafe apps from third party sites that demand strange permissions
- Not checking how the photo looks on a small phone screen before posting
If you avoid these mistakes, the trending glow photo making effect becomes much cleaner and you will spend less time re editing the same picture.
Conclusion
The glow style trend is not only about a single secret app. It is mainly about a clean subject, a dark contrasting background, and a careful glow outline that supports the face or object instead of covering it. Once you understand the steps, you can repeat the look in almost any editor that offers layers and light controls.
Start with just one simple glow portrait, test it as a profile photo or story, and notice what works on your own device screen. Then experiment with different colors, shapes, and layouts. Over time you will develop your own twist on the trend instead of copying random presets that rarely match your photo perfectly.
FAQ
Which app is best for glow photo effects
There is no single best app. PicsArt, Lightroom, Canva, and several AI based editors all work well. Choose one that supports layers, brushes, and glow or blur effects, and that you feel comfortable using.
Can I make glow photos without removing the background
Yes, but the effect is usually weaker. If the background is busy, the glow competes with other objects. A separated subject on a darker background nearly always looks cleaner.
Why does my exported glow photo look blurry
This often happens due to low resolution, over compression, or multiple resaves from different apps. Always export in high quality once and avoid editing the same compressed file again and again.
Is it safe to use AI glow filters on my selfies
It can be safe if you use trusted apps with clear privacy policies. Avoid tools that upload your entire gallery or request unrelated permissions. Check recent reviews before giving an app access to your camera and photos.
How do I make my glow photo look good on WhatsApp and Instagram
Keep the main subject centered, use a simple background, and export around 1080 pixels on the short side. Then upload directly from your gallery so the platform does the compression only once.
Thank you for reading this guide. If you found it useful, you can follow our blog for more latest tech news, useful editing apps, AI tools, and practical mobile tips and updates.